Today's post is going to be on Do It Yourself weddings... I think everyone likes to save money.... I know I do. So here are some great projects you can do yourself for your wedding not only will you save money but the effort will make your wedding even more special!!! DIY doesn't have to mean you yourself has to do it, if you have talented friends let them help!
When I did my best friend Katie's wedding we did lots of Do It Yourself projects. All her wedding centerpieces were done by her mom. They were florals with mirrors that we bought a Lowes and set candles around. We made her wedding ceremony program fans, by printing what we wanted on them off the computer then assembeling them. Also, her favors were Hershey's kisses that she had bought after Valentine"s Day to match her colors, rose, wine, and champagne, we bunched a few together in fabric and sat them in little plastic swans. Her corsages and boutineers were done by my mom who is very talented with flowers. And all she did was buy some bulk flowers from Costco and put them together.And the greatest DIY project of all Katie the bride is a hairstyalist so she was fixing the girls hair and giving her cousin a haircut before the wedding. So as you can see DIY projects are easy and fun!
Here are a few DIY projects from Marthastewartweddings.com

Ring Pillow
Cut linen to 6 1/2-by-12 1/2 inches and double-sided ribbon to 62 inches. Using disappearing-ink pen, draw a line down middle of cloth; draw a line across ribbon every 3 1/2 inches. Pin ribbon in loops as shown, matching marks on ribbon to line on fabric. Sew along the line. Fold fabric in half (with ribbon inside). Leaving a 1/4-inch allowance, sew the two edges parallel to central line. Sew fourth side halfway; turn pillow right side out through opening. Stuff with polyester batting, and stitch closed. Sew center of a 5-inch thin ribbon to pillow for tying on rings.
DIY Stationary

A calligraphed monogram from your wedding ceremony or a clip-art letter can be scanned into your computer and used as either a graceful embellishment or a bold graphic detail. A single repeated letter or a pair of initials makes a splashy customized cover for a note card.
With a desktop-publishing program, copy and paste initial to fill an 8 1/2-by-11-inch page on screen. Print onto card stock; cut out a 5 1/2-by-8-inch rectangle, partly cutting off some letters. Fold in half.
You can fit two cards on an 8 1/2-by-11-inch sheet; for each, position first initial on the right edge and second initial on the left. Print onto card stock, and cut cards apart. Fold sides of each to meet at center.

On a computer, copy and paste initial to fill page. Print onto colored paper; cut 1/8 inch smaller than the dimensions of the envelope with flap open. Slip the paper inside the envelope; fold the top corners using the angled edge of flap as a guide, leaving a 1/2-inch border. Remove and trim; attach with glue stick.
Photo postcards allow you to share your wedding-day memories -- and they are simple to create. The deckled edges and stamped "Post Card" heading evoke correspondence from the early 20th century.
Affix two 4-by-6-inch photos to a sheet of paper with a glue stick, lining up edges. (Be sure you have the photographer's permission to use the images.) Color-photocopy the page onto white card stock. Leaving a 1/8-inch border, cut out each card with deckle-edge scissors. With a rubber stamp that has an old-fashioned "Post Card" graphic (
download template and have stamp made at an office-supply store), stamp the back of each card. Using a ruler, draw a line down the center to separate your message from the address.

DIY Favors

Pretty Pouches for Wedding Favors
It's sew simple: Cut a rectangular strip of fabric to the desired width (allow for a 1/2-inch seam on both sides) and twice the preferred height. Fold the fabric in half with the right sides facing, stitch up the sides, and turn the whole thing inside out. Use pinking shears to finish the top edge, and fill with treats. Fashion ties out of fabric that's been torn on the grain
Any jarred items make great favors: honey, jams, fruits, mixes, hot chocolate, salsa, etc. They can be as exspensive as you want depending on what you put in them, what type of jar you use and how you dress them up. If you are going to put fabric on the lids like in this picture make sure to leave at least 2 inches of fabric for the sides so that you have plenty when you tie it back.
Rose Petal Cones
Here is another little wedding detail that can be prepared well ahead of the wedding. Gorgeous paper cones for e.g. rose petals which the guests will throw over you after the ceremony. I made these paper cones over a few evenings.
This actually gave me a little bit of time to sit and relax with a cup of tea as well
.
You need:
A template shape to draw and cut after (you can download mine at the bottom of this page).
A pair of scissors & some paper glue.
A pencil.
A couple of sheets of e.g. good quality wrapping paper to use as "lining" like I did (it takes time to line the cones - you can leave this out).
A basket or something similar to sit your cones in at the wedding (I found a couple of old baskets in the basement which I decorated with wide organza ribbon).
Note the small pink dot at the end of the thin grey line.
The dot indicates the spot from which the tip of your cone should begin.
How to:
Use the template provided below (download the PDF file and print out the shape on a thick piece of paper).
Draw with a pencil around your shape on the carboard/thick paper you would like to make your cones out of.
Cut out all your shapes with a pair of scissors.
Form a cone out of each of your carboard shapes til it has the size (the opening) you prefer.
Glue the edge so your cone stays in shape.
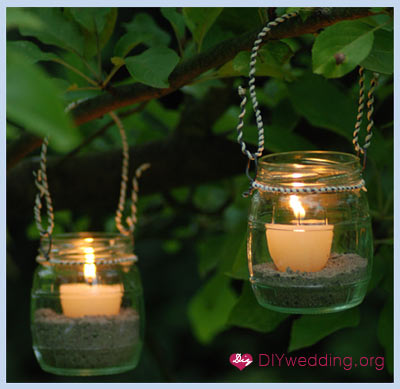
Garden Lanterns
Here is what you need to make one lantern:
1 recycled glass jar
2 pieces of steel wire (one piece to make the handle of the lantern and one piece the make the loop that goes around the top of the lantern – you need to measure these)
Beach sand
1 one small candle or tea light

 Image 1:
First measure out the length of the steel wire you need for the loop, add an extra 3-4 inches and cut off your first bit of wire.
Image 2:
½ inch in on your wire you make the first small loop. This is one of the two loops the loop the handle will go through later. To get a perfectly round loop I use a pen or something similar to shape my loop with. This way I can get two identical loops for my lantern.
Image 3:
Now place the loop on one side of your jar and pull the excess wire half way around the jar so it end exactly opposite your first loop. Make a reference point (bend the wire) as this is where you need to make your second loop for the handle.
Image 4:Now make you second loop like you made the first loop (see image 2)
Image 5:Place the wire around the glass jar and secure the two wire ends by twisting them around each other. Cut off excess wire.
Image 6:Cut off your last piece of wire to the length you want your handle to be in. Shape it as shown on the picture and pull each end of your “handle” through the loops.
Your lantern is ready and you can now decorate it with ribbon or stickers or something else or you can leave it as it is. To avoid the candles to move around inside the lanterns it’s a good idea to put a little bit of sand at the bottom of the jars.
http://www.diywedding.org/diy-wedding-ideas/ceremony-ideas/diy-garden-lanterns
I found this website they have great ideas on it some I showed on my page. They also have templates so I'm going to include it in my post today!
http://www.diywedding.org/diy-wedding-ideas/free-downloads
Another site that tends to have a lot of templates and fonts that you can use for free is Martha Stewart Weddings
Well I think this is all of the DIY projects I'm gonna show you today I am a huge fan of DIY projects so I am sure you will see more as my blog goes on!!! Hope this helped!


No comments:
Post a Comment